Training Guide 05
AI Avatar Video — type a script, get a presenter
Write what you want said, choose who says it, and AI Avatar Video produces a person delivering it to camera — in any of 175 languages. Use one of our presenters, or turn your own photo into your on-screen twin. No camera, no studio, no crew, no reshoots.
01 Two ways to make one
The landing page offers a choice — this is the only decision that changes the workflow.
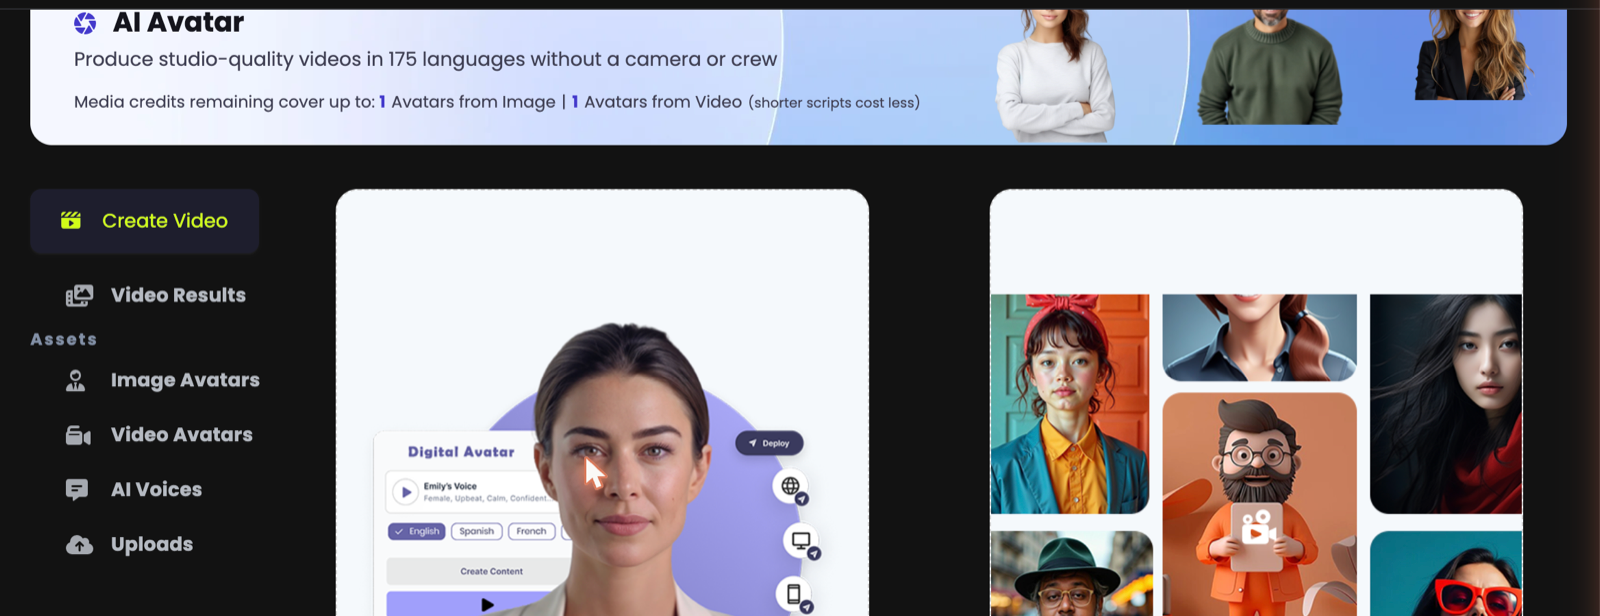
🎬From AI Avatar Videos
Use a ready-made presenter filmed in a real setting — office, sofa, studio. The most natural result, and nothing to prepare. Start here.
📷From AI Avatar Photos
Turn a still photograph into a talking presenter. Use it when the face has to be yours — or a specific face you're entitled to use.
02 Whose face you may use
Read this before you upload anything. It will save you a failed render.
A photo avatar must be a face you're entitled to use: your own, someone who has given you permission, or an AI-generated face. Uploading a celebrity, a public figure, or a photo of someone taken from the internet will be rejected by the verification system — the video won't be produced.
This isn't just a policy box to tick. The check happens automatically, so an unauthorised face simply fails rather than producing something you can use.
Generate one in AI Image — "professional headshot of a woman in her thirties, neutral background, soft studio lighting" — then upload that. It's nobody's likeness, so there's nothing to clear, and you can make it match your brand exactly.
03 The screen, explained
One menu on the left, three numbered steps in the middle and right.
Create Video
The three-step builder. Where you'll spend your time.
Video Results
Every finished video, ready to download.
-
Assets
Image Avatars — your photo avatars. Video Avatars — the filmed presenters. AI Voices — the voice library. Uploads — your own backgrounds and audio.
04 Step 1 — pick your presenter
Click a face; it previews on the right.
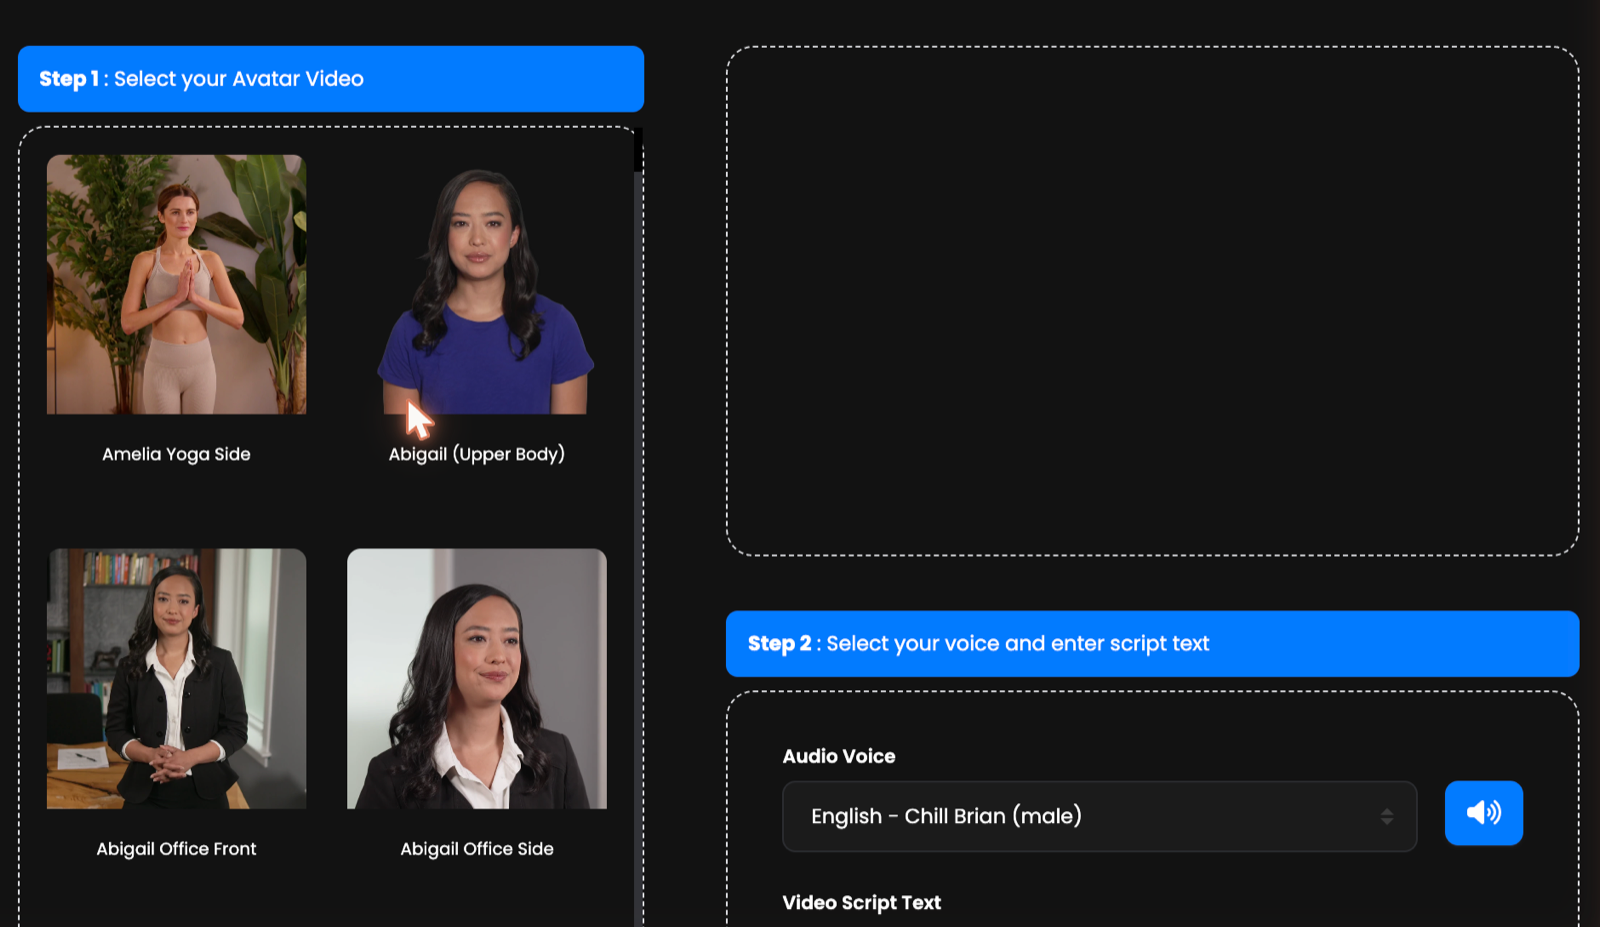
Notice that presenters repeat with different setups — Office Front, Office Side, Sofa Front, Sofa Side, Upper Body. That's your framing and location decision, so it's worth scrolling the whole list rather than taking the first face you see.
Office framings read as corporate and credible. Sofa framings read as friendly and personal. Upper-body shots cut tighter, which suits short social clips where the face needs to fill the screen.
05 Step 2 — voice and script
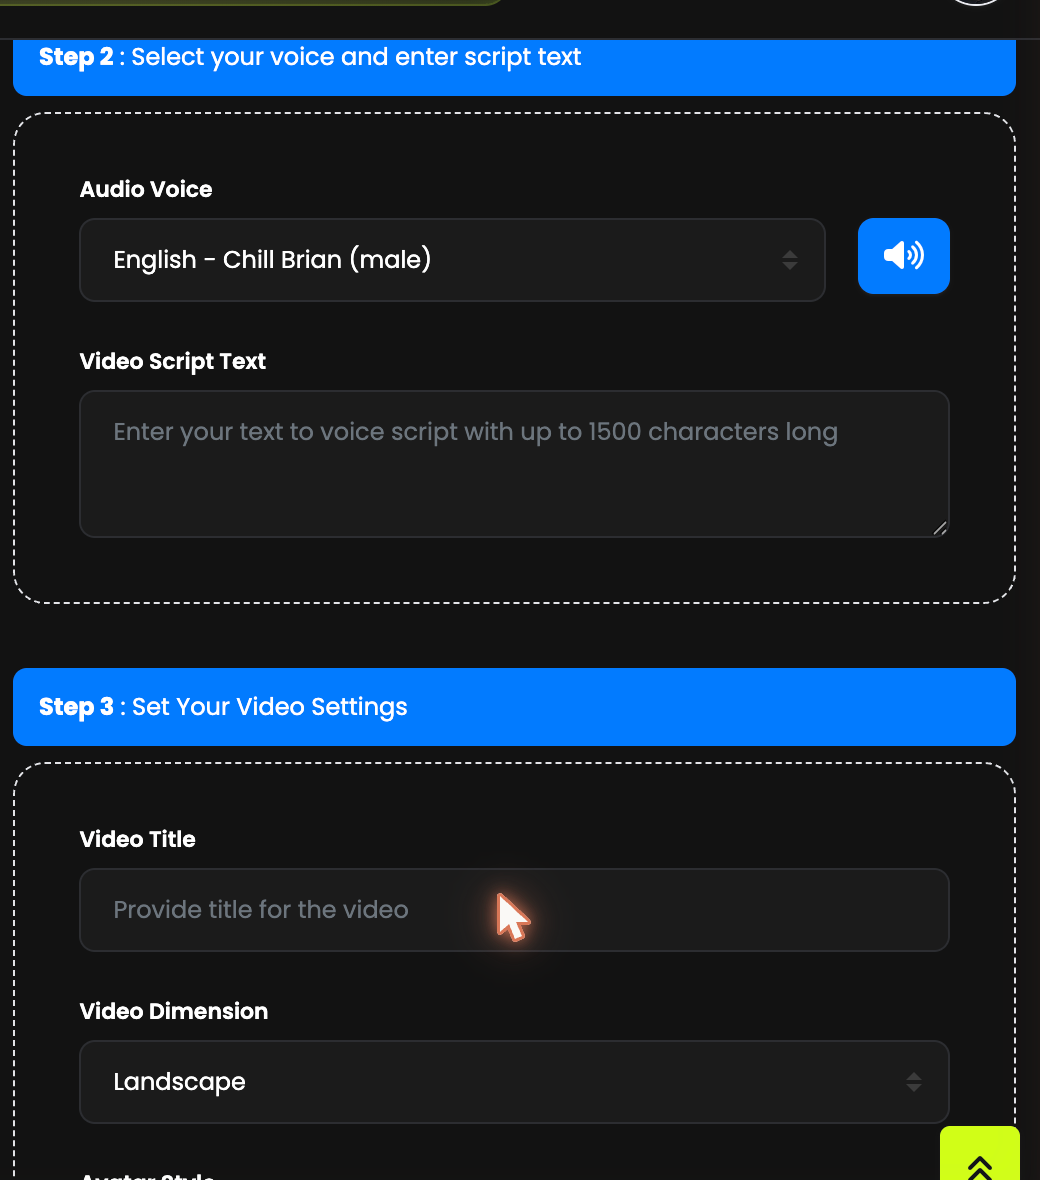
Where the 175 languages live.
-
Choose the Audio Voice
Voices are listed by language and character — "English – Chill Brian (male)". Press the speaker button beside the dropdown to hear one before you use it. This is also where you switch language: pick a Spanish, Hindi or Arabic voice and your script is delivered in that language.
-
Write your Video Script Text
Up to 1,500 characters — roughly two minutes of speech. This is exactly what the presenter will say, so read it aloud yourself first.
Short sentences. One idea each. Commas where you'd breathe. Avoid brackets, bullet symbols and long numbers — they read badly out loud. If you stumble reading it, so will the avatar.
Write it in AI Chat or AI Writer first — "a 60-second product intro, warm and confident, about 130 words" — then paste it here.
06 Step 3 — video settings
Title, shape, style, background. Then generate.
| Setting | What to do with it |
|---|---|
| Video Title | For your own reference in Video Results. Name it properly. |
| Video Dimension | Landscape for YouTube, websites and presentations. Portrait for Reels, Shorts and TikTok. |
| Avatar Style | How the presenter is composed in frame. Normal is the safe default. |
| Background Color | A solid colour behind the presenter. Use your brand colour. |
| Background Image | Anything you've added under Uploads — your own branded backdrop. |
| Background Image URL | A link to an image hosted elsewhere, if you'd rather not upload. |
Photo avatars get three extra controls in this step, because a still needs more direction than filmed footage:
✂️Avatar Crop Style
How tightly the face is framed.
🗣️Avatar Talking Style
How much the head and body move while speaking. Stable looks most professional.
😊Avatar Expression
The overall facial expression through the delivery.
Then press Generate Video.
07 Making a photo avatar
A one-time setup — then it's in your library forever.
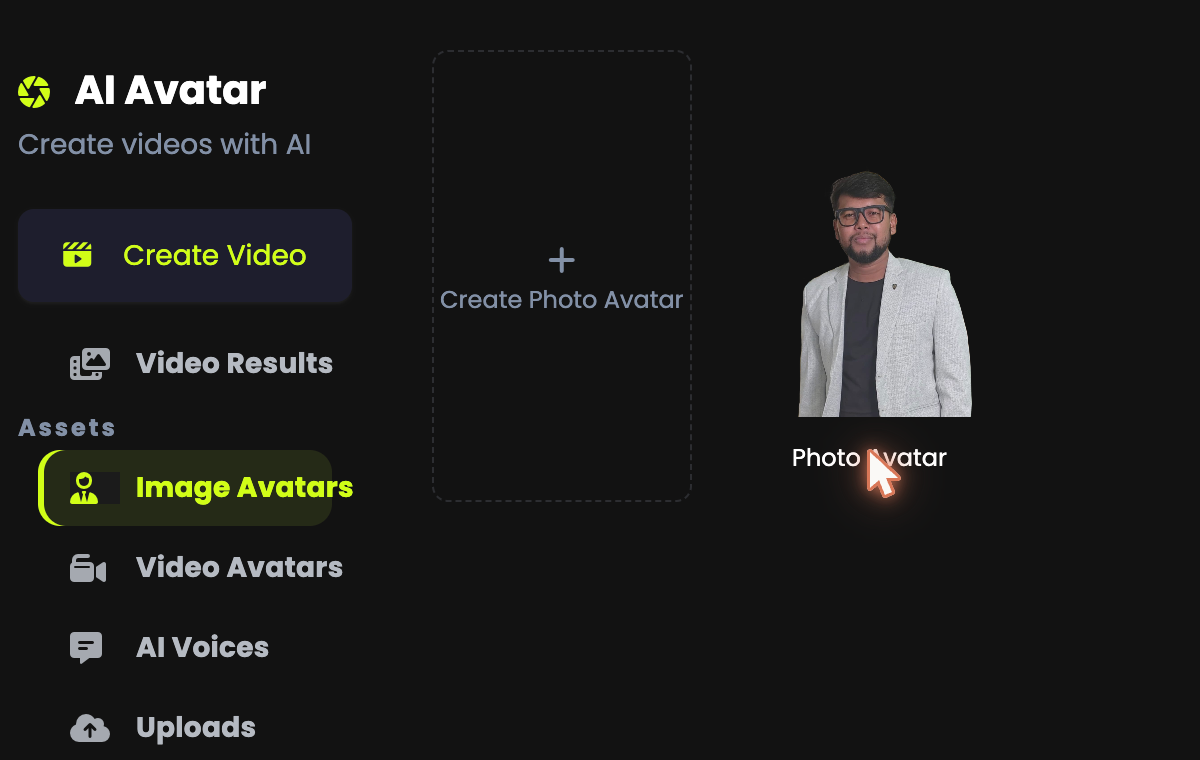
Go to Image Avatars → + Create Photo Avatar
-
Upload a photo that meets these conditions
- One person only
- Facing the camera, whole face visible
- Well lit, in focus, eyes open
- Nothing covering the face — no sunglasses, no hand across the chin
- A face you're entitled to use (see section 02)
Wait for it to process
Your new avatar appears in the grid and stays there for future videos.
Build as normal
Create Video → your photo avatar is now an option in Step 1.
A sharp, evenly lit, straight-on portrait produces a convincing avatar. A dim, angled, or low-resolution snapshot produces an uncanny one — and no setting in Step 3 can rescue it. Spend two minutes taking a good photo.
08 Backgrounds and uploads
Make the video look like it belongs to your brand.
The Uploads area accepts images, videos and audio. These become your background images, background videos and voiceovers — so instead of a plain colour behind your presenter, you can use your own studio backdrop, a branded graphic, or moving footage.
Generate a background in AI Image at a landscape resolution, upload it here, and every avatar video you make sits in front of a scene nobody else has.
09 What it costs
Priced by the length of your script.
Avatar videos use media credits, and the cost depends on how long the script is — the banner at the top of the page says it plainly: shorter scripts cost less. That banner also estimates how many avatar videos your current balance covers, from both photos and videos.
- Check the banner before you write. If it says your credits cover one video, plan accordingly.
- Trim the script, not the quality. Cutting 40 words of throat-clearing at the start costs you nothing and saves credits.
- Make one strong 45-second video rather than three rambling two-minute ones.
Your credits are returned automatically and the result card explains what went wrong. The most common cause by far is an unauthorised face — see section 02.
10 Video Results
Where finished videos wait for you.
Rendering takes a few minutes, so don't sit on the page. Everything lands in Video Results, where you can play it and download it. Keep your own copy of anything you publish.
11 Troubleshooting & FAQ
The questions we're asked most.
My photo avatar was rejected
Almost always the face-usage rule in section 02 — the system won't process a face you can't demonstrate a right to use. Upload your own photo, or generate a face in AI Image. Also check the photo itself: one person, facing camera, whole face visible, good light.
Step 1 is empty on the photo path
You haven't created a photo avatar yet. Go to Image Avatars → + Create Photo Avatar first — the Create Video screen only lists avatars you already have.
The avatar mispronounces a word
Spell it phonetically in the script. "QynTro" might become "Quin-Tro". Nobody sees the script, so write whatever produces the right sound.
The head moves too much / looks unnatural
On a photo avatar, set Avatar Talking Style to Stable and keep the expression neutral. If it still looks off, the source photo is usually the cause — try a sharper, straight-on portrait.
Can I make the same video in another language?
Yes. Keep everything the same, choose a voice in the target language, paste the translated script, and generate again. Ask AI Chat for the translation first. It's the fastest way to localise a campaign — same presenter, many markets.
How long can the video be?
The script box takes up to 1,500 characters, which is roughly two minutes of speech. For anything longer, split it into parts and join them in your editor.